Layouts
Overview
VIA requires a definition of both the physical arrangement of keys and the mapping of those keys to the switch matrix. It optionally requires definition of layout options - alternative physical arrangements of keys, such as different bottom rows, split right shift, etc.
Everything inside the keymap property is KLE JSON data, which can be edited using Keyboard Layout Editor. This contains the switch matrix coordinates for each key, and optionally information about layout options.
The labels property is used to name the layout options.
Keyboard Layout Editor will not load the <keyboard_name>.json that VIA uses, only the KLE JSON within the keymap property. The user can copy the value of the keymap property into the "Raw data" tab of Keyboard Layout Editor, i.e. everything inside the outer [ and ]. Unfortunately, copying and pasting the other way does not work. (KLE's "Raw data" tab contains JSON with missing " around property names.) In KLE, save as a JSON file and then copy the contents of the JSON file into the keymap property of the <keyboard_name>.json
KLE JSON Rules
The KLE JSON should follow these rules:
- Horizontal and vertical gaps are allowed (for separation of rows, columns, blockers, etc.)
- Do not use stepped keys.
- Rotated keys are allowed but layout options for rotated keys is not supported.
- Use key color
#ccccccfor alphas,#aaaaaafor modifier keys and#777777for accents (i.e. Esc, Enter, arrows, etc). - Use legend color
#000000for all legends
Note: The key colors used in the KLE will be used by VIA to map alphas/modifiers/accents to a color theme, thus all keys which are the "modifier" color in a standard keycap set should be set to #aaaaaa. Some color themes may have the same color for alphas and modifiers.
Switch Matrix Co-ordinates
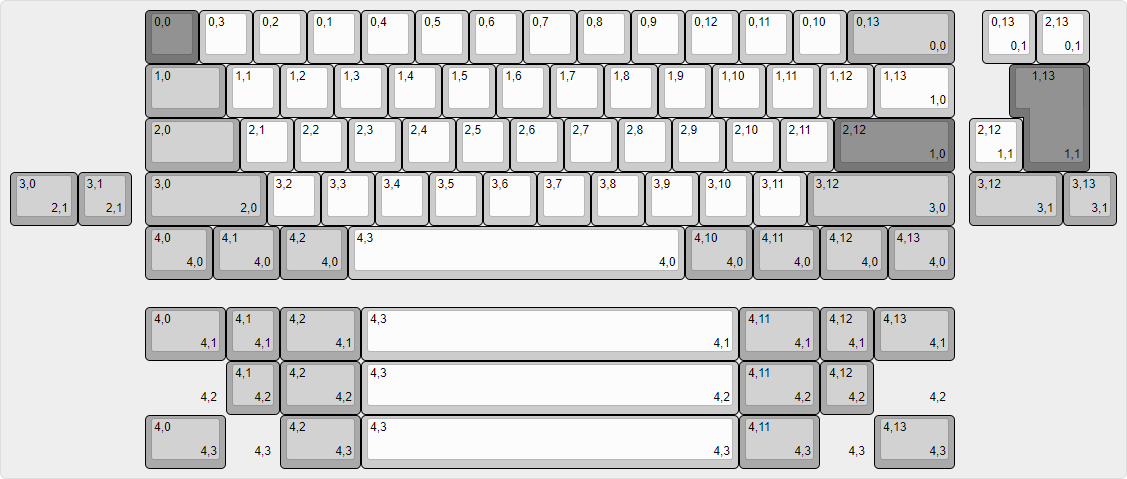
The mapping from physical layout to switch matrix layout is defined by the top-left legend of the key, using row,col format.
Thus, the mapping that is usually done by a LAYOUT_*() macro in QMK is instead stored in the key objects in the KLE JSON.
Most LAYOUT_*() macros in QMK use some row,col naming convention so translation into the KLE JSON should be straight-forward.
KLE Example:

QMK Layout Macro Example:
#define LAYOUT_60_all( \
    K00, K01, K02, K03, K04, ...
    K10, K11, K12, K13, K14, ...
    K20, K21, K22, K23, K24, ...
    ...
Rotary Encoders
You can setup your VIA layout to display rotary encorders right in the UI. To do this you need to a few things setup properly in QMK.
Required setup in QMK:
- Enable encoder maps as per QMK
- Add ENCODER_ENABLE = yes to rules.mk
- Add ENCODER_MAP_ENABLE = yes to keymaps/via/rules.mk
- Add an encoder map to keymaps/via/keymap.c
- The encoder map should be defined for the same number of layers as configured for VIA (default 4)
- Add the encoder to the VIA keyboard definition
Encoders without push switch (Just twist, no push)

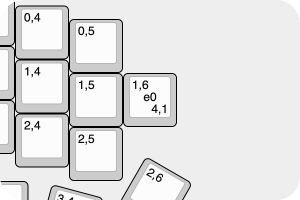
Add a "key" to the KLE JSON with e0, e1, etc. as the center label. The number will match the encoder ID used in the encoder map.
Rotary encoder with a push switch

Define the switch matrix co-ordinates like other switches and add e0, e1, etc. to the center label of the switch
Optional Rotary Encoder (combined switch/rotary encoder footprint)
Use VIA Layout Options like other switches. VIA can render either a knob or switch or empty space.
Here's what it looks like

Layout Options
If a keyboard supports multiple physical layout of keys, then the KLE JSON definition will contain the "default" layout as well as all the layout options.
The layout option and layout option choices are defined by the bottom-right legend of the key, using option,choice format.
A "layout option" is defined as an area of the keyboard which can change into more than one arrangement.
A "layout option choice" is one arrangement of a layout option.
Each layout option is defined by a number, the first number in the bottom-right legend. The second number defines which "choice" it belongs to, within that layout option.
The "default layout" (what is presented in VIA by default) is defined as all keys without the option,choice in the bottom-right label, and all keys which have option,0 in the bottom-right label (i.e. the "default" choice for all the layout options). VIA will use the bounding box of all the key in the "default layout" as the extent of the "keyboard", so layout option choices can be positioned above, below, left or right of this bounding box.
Layout option choices must all have the same coverage, i.e. they overlap exactly in shape, but can vary in keycap sizes and arrangement. Layout option choices must be aligned either vertically or horizontally with the "default" layout option. They must all contain the switch matrix co-ordinates in the top-left label. Note that setting the switch matrix co-ordinates may require testing real hardware. For example, the non-split (center) switch of a split shift or backspace may be connected in parallel to the switch to the left or right. One can put different keycodes in a split key scenarion and test which keycode event is sent when the center switch is pressed or shorted.
Layout options should be at the finest granularity possible. For example, ANSI/ISO should be defined as three separate layout options, ANSI/ISO Enter, Split Left Shift, Split Right Shift.
Layout options can use "decal" keys to represent optional blockers, i.e. HHKB or WKL.
VIA will present the layout options to the user, and store the state of the choices in the device, so it persists between configuration.
Example:

This example defines the layout option "Split Backspace".
It shows:
- the 2U backspace legend is
0,0meaning it belongs to layout option #0, layout option choice #0 - the 2U backspace is the default (because it is
-,0) - the 2U backspace is positioned as it should be relative to other keys that are constant, because it is the default.
- the split backspace keys have legends
0,1meaning they belong to layout option #0, layout option choice #1 - the split backspace keys have the same bounding box (i.e. cover the same area) as the 2U backspace
- the split backspace keys bounding box is aligned vertically with the 2U backspace
- all keys have switch matrix coordinates in the top-left legends
Let's consider another example, the WT60-D layout:
This shows split backspace as the first of many layout options, and some other possibilities, such as:
- aligning layout option choices to the left, right and below the "default layout"
- layout options with more than two choices
- layout options incorporating "blockers" (keys with
Decalchecked)
Layout Option Labels
Layout options are assigned labels from the labels property.
Example:
{
  ...
  "layouts": {
    ...
    "labels": [
      "Split Backspace",
      "ISO Enter",
      "Split Left Shift",
      "Split Right Shift",
      ["Bottom Row", "ANSI", "7U", "HHKB", "WKL"]
    ],
    ...
  }
  ...
}
The labels property is an optional array of string or string[] and defines the labels for the layout controls.
The order of the labels is important as the implicit index is used to map to the group number e.g. Split Backspace corresponds to layout option #0, ISO corresponds to layout option #1, etc.
If an item in the labels array is a string, it is presented as a toggle button, the off state maps to layout option choice #0 (the default), the on state maps to layout option choice #1.
If an item in the labels array is a string[], it maps to a select control with the first item in the array being used as the label for the control and the following items being used as labels of layout option choices #0, #1, #2, etc. In the example above, the Bottom Row is the label, ANSI maps to layout option choice #0, 7U maps to layout option choice #1, etc.